India Stack API Integration: Why ONDC and GeM Projects Fail Without the Right Architecture

India Stack API Integration for ONDC, GeM, DigiLocker, Account Aggregator, and UPI.

Introduction

India Stack API Integration projects are becoming a priority for government agencies that need to connect ONDC, GeM, DigiLocker, Account Aggregator, and UPI through secure, scalable architectures. India Stack API Integration projects rarely fail because of APIs alone. They fail because ONDC, GeM, DigiLocker, Account Aggregator, and UPI use different authentication models, data contracts, and operational workflows. When government agencies need these platforms to work together, India Stack API Integration becomes an architecture challenge rather than a simple software development task.

A state-government procurement agency in South India asked Codelynks to solve a specific problem: 14,000 MSMEs registered under a state PLI program needed to sell on GeM and ONDC simultaneously, but neither platform shared a product catalog standard, consent model, or order management schema.

The problem is not unique. As India Stack v2 expands its API surface and ONDC scales past 630 cities and 1.16 lakh active sellers, government agencies are becoming integration operators by accident. They inherit the technical liability of bridging platforms that were never designed to speak to each other. This post lays out what a production-grade India Stack API platform looks like and why most first attempts fail.

What Government Agencies Are Actually Building

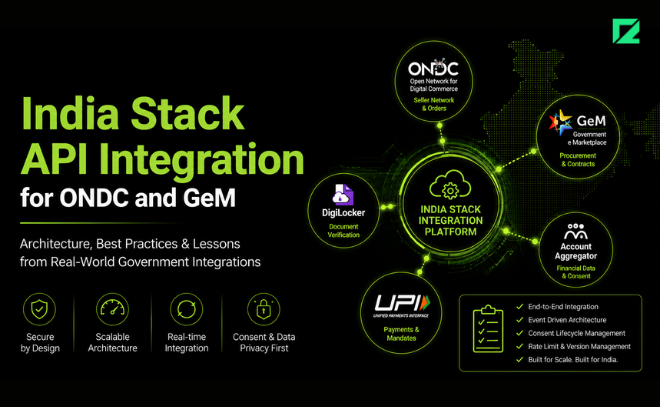
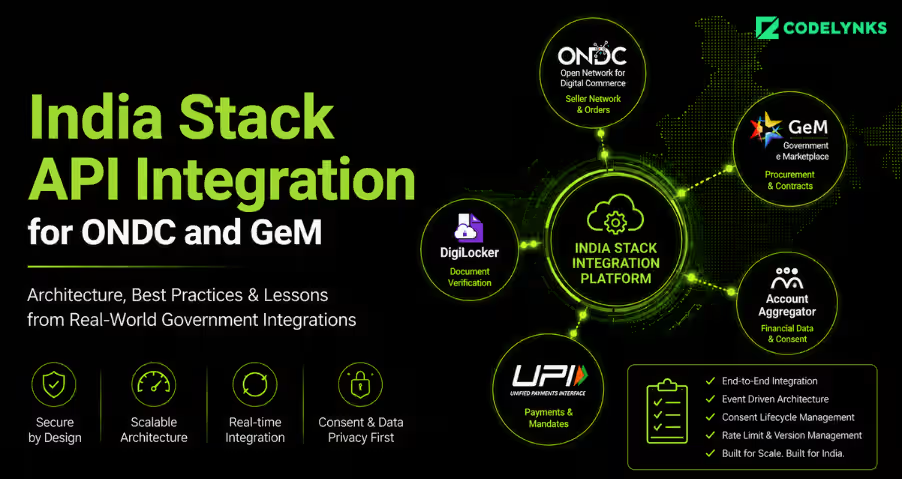
The phrase “India Stack integration” is usually shorthand for something far more complex. A procurement agency connecting MSMEs to the public e-marketplace ecosystem typically needs to touch five separate API domains: ONDC (seller onboarding, catalog sync, order events), GeM (product registration, bid submission, contract workflows), Account Aggregator (financial consent for MSME credit decisioning), DigiLocker (document verification for GST, Udyam, PAN), and UPI (payment settlement and mandate management).

Each domain has a different authentication model. ONDC uses a Beckn protocol with ED25519 key signing per request. GeM runs on OAuth 2.0 with certificate-based API gateway authentication. Account Aggregator flows require the operator to become a Financial Information User (FIU) with RBI registration. DigiLocker uses Aadhaar-linked OAuth with a 30-minute token TTL.

The point is not that these are hard. The point is that no single developer or team holds the full knowledge surface. Most integration projects understaff the auth and consent design phase, then discover the gap when staging tests begin. A successful India Stack API Integration strategy requires more than API connectivity: it requires governance, security, consent management, and event-driven processing.

Every successful India Stack API Integration project starts with a clear understanding of authentication, consent, data models, and event-driven communication across government platforms.

Why the First Integration Always Fails

India Stack is not a single API. It is a network of networks, each with different auth models, rate limits, and data contracts. Most teams treat it as a unified platform and design a single integration layer. That is the wrong model. Most India Stack API Integration failures occur because asynchronous workflows, consent states, and API version changes are not considered during the initial architecture phase.

The failure pattern is consistent. A team builds a synchronous REST wrapper over the ONDC seller node. Product catalog sync works in testing. In production, ONDC sends asynchronous order callbacks via webhook with a 5-second acknowledgment SLA. The synchronous wrapper cannot handle the callback pattern. Orders are missed. The ONDC network flags the seller node for non-compliance after 72 hours of missed callbacks, triggering a suspension workflow.

The second failure pattern is consent state management. Account Aggregator consent flows have three states that can change independently: approved, revoked, and expired. A system that only checks for approval at the point of data request fails when a consent is revoked mid-session. This is not a bug you catch in unit tests. It surfaces in production when an MSME owner revokes a consent from the AA mobile app while a credit check is in progress.

Both failures are predictable. Neither requires novel engineering to prevent. They require a clear mental model of the integration surface before a line of code is written.

The ONDC Integration Tiering Model

Codelynks uses a four-tier model to classify integration depth and set client expectations before architecture begins.

Tier 1: Catalog Bridge. The seller’s existing product database syncs to ONDC via scheduled batch jobs. No real-time order handling. Suitable for government agencies managing low-volume, high-value procurement — construction materials, uniform supply. Latency acceptable at 4-hour sync cycles. No consent flows required.

Tier 2: Live Seller Node. Real-time order handling with webhook receivers, order state machines, and seller acknowledgment logic. Requires async architecture — message queues, not REST polling. Suitable for agencies managing commodity procurement at volume. Consent flows required only for financial products.

Tier 3: Multi-Domain Integration. Live seller node plus Account Aggregator consent flows for MSME credit decisioning, DigiLocker document verification, and UPI collection mandates. This is the tier the South India procurement agency needed. Requires a dedicated integration platform, not application-layer code.

Tier 4: Agentic Delegation Layer. Built on the patterns proposed in the Doot whitepaper: an AI agent acts on behalf of a citizen or MSME, making routine procurement decisions using delegated identity and scoped consent. No production deployment of this tier exists in India as of June 2026, but the API design decisions made at Tier 3 determine whether Tier 4 is achievable later.

What a Production Integration Platform Looks Like

The South India agency’s platform has three components that most vendor proposals leave out.

First, an event ledger. Every API call, callback, consent event, and order state change is written to an immutable append-only log before any business logic runs. This is not a logging system. It is the system of record. When the ONDC network disputes an order acknowledgment timestamp, the ledger wins.

Second, a rate limit budget manager. ONDC’s production network enforces per-seller-node rate limits that differ from the sandbox. GeM’s API gateway has burst limits not published in documentation. The platform maintains per-domain token buckets with a configurable safety margin and exposes a real-time budget dashboard to the agency’s operations team.

Third, a consent lifecycle service. Every AA consent is tracked with its own state machine: requested, approved, active, expiring-soon, expired, revoked. The system sends proactive renewal requests 72 hours before expiry. Revocation events trigger immediate downstream notifications to any in-flight credit processes.

The most expensive mistake in government integration work is designing for the current API version instead of the deprecation schedule. ONDC has published three major protocol versions since 2022. GeM deprecated its v1 product registration API in March 2026 with 90 days’ notice. A platform without version management becomes a firefighting operation within 18 months.

Anti-Patterns That Appear in Every RFP

Four patterns appear in government IT RFPs that reliably predict project failure.

A single middleware layer for all integrations. Different India Stack domains have incompatible processing models. Forcing ONDC’s async callbacks through the same middleware as GeM’s synchronous RFP submission creates a reliability dependency between two unrelated workflows.

Schema mapping in application code. Product catalog field mappings between a state government database, GeM’s product schema, and ONDC’s catalog model change with every platform update. These mappings belong in a configuration layer, not embedded in application code.

Testing against sandbox only. ONDC’s production network behaves differently from its sandbox in three documented ways: callback timing, rate limits, and error response schemas. Budget for production integration testing before go-live.

Ignoring the deprecation calendar. The most experienced teams maintain a 12-month view of API version deprecation schedules across all integrated domains. Without it, a single vendor deprecation can ground an entire procurement platform.

What This Means for Government and Public Sector Leaders

An ONDC seller node that works in your staging environment and fails at 11 AM on a flash-sale day is not an integration. It is a liability. The same applies to a GeM catalog sync that silently drops SKUs when a category schema update is released without notice.

If your agency is building or procuring an India Stack integration this year, three things are worth doing before the architecture is finalized. Ask your vendor what their consent lifecycle management approach is, specifically. Ask how they handle ONDC’s asynchronous callback model under load. Ask what their protocol version migration playbook looks like. If the answers are vague, the integration will be renegotiated in six months.

More Blogs: Choosing the Right Technology for Your Web Development

6 API Security Best Practices: Protect APIs with mTLS, JWT, and Positive Security

api-security-best-practices

Introduction

There is more concern about API security now that systems increasingly rely on APIs. With APIs fast becoming an integral component of many business activities, connecting mobile apps, IoT devices, and also cloud-based services, APIs have also increased the scope and thus risks associated with security. Following API Security Best Practices is now essential to ensure that every API remains protected against emerging cyber threats. Following API Security Best Practices is now essential to ensure that every API remains protected against emerging cyber threats.

We will discuss how full-fledged security, from API discovery to mutual TLS and OWASP Top 10 security, guards against all kinds of threats against the security of API security framework.

API Security Best Practices: API Discovery and Endpoint Protection

Knowing what you are protecting is the first step towards solving the problem of protecting an API. Generally, organizations do not know all their API endpoints, and thus, there is always a potential for security blind spots. API discovery tools automatically identify your API endpoints and schemas with machine learning and simple heuristics. By combining discovery tools with API Security Best Practices, teams can prevent unauthorized access before it impacts systems. Without this visibility, it would be impossible to ensure that both documented and undocumented APIs are accounted for and secured.

Using the patterns of network traffic, API discovery systems can identify previously unknown endpoints so the security teams can proactively manage and protect these entities. This capability is critically important in large application scenarios having complex microservice architectures.

Implementing OWASP Top 10 for API Security Best Practices

OWASP Top 10 enumerates most common security risks against APIs, including improper authentication, data exposure, DDoS attacks, among other things. 

Cloud-based API security tools will prevent such attacks because they guard against:

  1. Authentication failure: Strong identity verification
  2. Data loss: Protects sensitive information from unauthorized access
  3. Abuse: Blocks unwanted API calls and brute-force attacks
  4. DDoS: Detects volumetric attacks that overwhelm a system.

With security practices integrated into organizations’ systems that align with the OWASP API Top 10, an organization minimizes its risk from critical threats. Security platforms can protect against common vulnerabilities but also automatically block suspicious traffic, thus acting as a preventive measure against exploitation.

Mutual TLS (mTLS) and JWT: API Security Best Practices

Mutual TLS (mTLS) provides yet another layer of security because it actually mandates mutual authentication by both the client and the server of each other through digital certificates, thus filtering only the legitimate devices, in this case, mobile applications or IoT connected appliances.

To further add security, mTLS is used in combination with JSON Web Tokens (JWT) to prevent the illegitimate clients from making API requests. Thus, even though the systems authenticate requests, they also validate those requests to ensure that APIs are accessed only by the proper parties: be it for sending data or for retrieving data.

For example, a healthcare provider who is using APIs to manage personally identifiable patient data should employ mTLS so that only authenticated devices, such as secure mobile applications, can access that system.

Positive API Security: Best Practices for Secure APIs

Block the threats, but ensure that only valid traffic is received through APIs. Good API security relies heavily on OpenAPI schemas predetermined and set which defines what kind of traffic your API should receive. This way the systems can block malformed requests, HTTP anomalies, and untrusted inputs by enforcing these rules.

This approach limits the unknown threats and reduces the attack surface of the API, since they only allow requests that fit your OpenAPI specifications. Positive security models reject all requests that are not put together as if they would behave according to the expected behavior of your API, thus putting up a very good defense against sophisticated attacks.

API Abuse Detection and Sensitive Data Protection as Part of API Security Best Practices

APIs are increasingly being targeted for abuse, the primary aspect of which would be volumetric-that is to say, targeting a large volume of malicious requests that can overwhelm the system-or in a sequential API abuse where attackers try to exploit API calls in some logical sequence.

Security platforms employ heuristics and anomaly detection to identify and stop suspicious activity through various APIs, such as XML, RESTful, or GraphQL. In this way, such systems can prevent abuse of APIs before it negatively impacts services or compromise data through identification of unusual request patterns.

For example, an online shop using GraphQL APIs for product searches may detect attempts by bots doing scraping from the website by sensing high frequency or unusual query patterns different from the actual behavior of legitimate users making queries on the website.

Sensitive Data Detection: Prevention of Data Leaks

The API responses will expose many forms of sensitive data including PII, financial data, or health records. Therefore, ensuring that such information stays behind proper protection and does not come out will be vital to staying in compliance and avoiding breach.

Sensitive data detection tools are always scanning payloads generated in the response from the API to detect and block sensitive information transmission. In case sensitive information is detected, a system can mask or block the data from its release into the open public space. Such an automated approach will help lower the chances of data leakage and will ensure that APIs comply with privacy regulations such as GDPR or HIPAA.

For example, sensitive data detection would ensure credit card numbers are not leaked in the response of the API while processing transactions by an institution engaged in financial activities.

Conclusion

A Holistic Approach to API Security

With today’s globalization, it is very important to defend your infrastructure from the threats coming through APIs, while assuring security, privacy, and performance. All these range from API discovery, OWASP Top 10 security, mTLS authentication, to positive API security. All these implementations will mean that the access methods of the organization through APIs will be secure and deliver flawless performance to the users.

API abuse detection with sophisticated attacks and sensitive data protection are more critical than ever with such sophistication in attacks.

Adopting API Security Best Practices ensures robust protection, compliance, and smooth API performance for modern applications.

More Blogs: Achieving DORA Compliance with Data Protection: A Comprehensive Guide

Setting Up Appium for iOS Automation on macOS: Beginner’s Guide

Appium for iOS Simulator running Xcode project on macOS

Introduction

Appium for iOS simulator is essential for mobile test automation on macOS, but setting it up can feel overwhelming. Setting up Appium for iOS automation on macOS can feel a bit overwhelming – there are so many tools, environment variables, and hidden gotchas. But don’t worry – we’ve got you covered. 

Whether you’re a QA engineer, SDET, or just starting out with mobile test automation, this guide will walk you through everything you need to run Appium tests on an iOS simulator.

Steps with real examples and tips from the trenches. 

First, Check Your Shell for Appium for iOS Simulator Setup

Your shell controls how environment variables are loaded, and this matters when setting things up.

To find out which shell you’re using, run this in Terminal:

echo $SHELL

You’ll probably see either:

/bin/zsh (Zsh – the default on newer Macs)

/bin/bash (Bash – common on older versions)

Now, Open the Right Config File for Appium for iOS Simulator

Depending on your shell:

For Zsh (most common now):
nano ~/.zshrc

For Bash:
nano ~/.bash_profile

Add Java Path to Run Appium for iOS Simulator

Paste this into your file:

export JAVA_HOME=$(/usr/libexec/java_home) export PATH=$PATH:$JAVA_HOME/bin

Then save and reload your shell config:

source ~/.zshrc  or ~/.bash_profile if you’re using Bash

Step-by-Step Setup

Install Homebrew for Appium for iOS Simulator Dependencies

Homebrew is the package manager that makes everything easier on macOS.

/bin/bash -c “$(curl -fsSL https://raw.githubusercontent.com/Homebrew/install/HEAD/install.sh)”

Install Node.js and npm

Appium runs on Node.js, so let’s install that next:

brew install node

Check that it worked:

node -v

npm -v

Install Appium for iOS Simulator on macOS

Now that Node is ready, install Appium globally:

npm install -g appium

And confirm it’s installed:

appium -v

Use Appium Doctor to Verify Appium for iOS Simulator Setup

This handy tool checks if your system is Appium-ready:

npm install -g appium-doctor

appium-doctor

Follow the suggestions it gives you – this step saves a lot of future headaches.

Configure Xcode for Appium for iOS Simulator

Install Xcode: Grab the latest version from the Mac App Store and launch it once.

Install Command Line Tools: xcode-select –install

Accept the License Agreement: sudo xcodebuild -license accept

Check Xcode Path

Run: xcode-select -p

You should see: /Applications/Xcode.app/Contents/Developer

If not, fix it: sudo xcode-select -s /Applications/Xcode.app/Contents/Developer

Install iOS Simulators for Appium for iOS Simulator Testing

You’ve got options here:

Via Xcode:
Open Xcode → Settings → Components → Download simulators

Via Terminal:
xcodebuild -downloadPlatform iOS

Open Simulator manually:
open -a Simulator

Confirm iOS SDK is Installed

Check that the SDK is in place:

xcrun –show-sdk-path –sdk iphonesimulator

You should see something like:

/Applications/Xcode.app/…/iPhoneSimulator.sdk

Install Extra iOS Tools for Appium for iOS Simulator

These tools help with device communication and testing – even if you’re only using simulators, it’s good to have them:

brew install carthage brew install ios-deploy brew install libimobiledevice

Troubleshoot Common Issues in Appium for iOS Simulator

Even with a solid setup, things can go sideways. Here are some common problems – and how to fix them.

Problem: “Node Not Found” in Eclipse or IntelliJ

What’s going on? macOS GUI apps don’t load your terminal environment variables.

Fix it:

Open Run > Run Configurations in your IDE

Select your test config

Go to the Environment tab

Add the following:

PATH – Use the value from echo $PATH

NODE_HOME – Path to your Node install

ANDROID_HOME – (Only needed if you’re also testing Android)

Problem: npm ERR! EACCES

This happens when you install npm packages using sudo, which messes up permissions.

Fix it:

sudo chown -R $(whoami):$(id -gn) ~/.npm npm install -g appium

You’re Ready to Automate!

With this setup, your Mac is now fully prepped for running Appium tests on iOS simulators

If you’d like to go further:

Build your first test script

Set up real device automation

Or configure Android automation

More Blogs : Key Factors to Consider When Choosing a QA Testing Partner

  • Copyright © 2026 codelynks.com. All rights reserved.

  • Terms of Use | Privacy Policy